Rainscreen Systems Utilizing Laminated Engineered Bamboo


Installation Do’s and Don’ts
When working with laminated bamboo panels or dimensional components, there are some general guidelines to follow.
Do’s
- Use sharp tool bits and blades when making cuts into laminated bamboo wall cladding or other parts of the wall cladding substructure. This will help minimize any “tear-out” to the panels when cutting.
- Pre-drill holds for direct fastening into the wall cladding prior to installing the fastener.
- Keep wall cladding surfaces clear of unnecessary clutter and buildup of waste and drop materials. If not handled correctly, unused or scrap wall cladding boards could damage installed wall cladding surfaces.
- Fasten the wall cladding according to the manufacturer’s installation guidelines. This will help minimize issues due to expansion and contraction.
- Keep wall cladding products stored in cool areas prior to installation. Wall cladding exposure to direct sunlight prior to installation may cause the materials to build up heat and expand, causing the boards to lengthen.
Don’ts
- Avoid wearing loose clothing when using tools that spin at high RPMs to cut or install laminated bamboo panels.
- Do not allow dust from concrete, landscape blocks, rock, or other masonry products to accumulate on the wall cladding surface. If any dust should occur, it should be cleaned immediately. Failure to do so can cause surface staining.
- Do not mount directly to concrete. A sleeper should be used with a minimum height of ½ inch. The sleeper should be mounted to the concrete with the appropriate fasteners where the wall cladding product will be mounted to the sleepers either by face fastening or using the hidden clip system.
- Do not install where low-emissivity (low-e) glass is used. Low-e glass is designed to prevent heat gain within a structure and can cause unusual heat buildup on exterior surfaces. Excessive heat buildup greater than normal exposure limits could potentially cause several issues, such as sagging, bowing, warping, discoloration, excessive expansion/contraction, and accelerated weathering.
Fasteners
When choosing fasteners, it is recommended that high-quality fasteners be selected based on the following specifications. Be sure to use stainless steel screws with a minimum screw size of #10. Face-fastening screws should have a minimum length of 2 inches. Fasteners should drive at least 3⁄4 inch to 1 inch into the solid framing behind the wall cladding.
Avoid using flathead screws. Trim-head screws typically provide better results. Always sample the type of fastener in a scrap piece of wall cladding prior to using for final installation. For installation jobs near coastal areas with a high salt content in the air, be sure to use stainless steel fasteners with a minimum alloy of 316 stainless steel.
Storage of Material Prior to Installation
Prior to installing laminated engineered bamboo rainscreens, ensure that all products are stored on flat, level surfaces. It is also important that materials are stored in cool, shady areas away from direct sunlight. Ensure that the storage area temperature does not exceed 120 degrees Fahrenheit. Do not stack in bundles over four units high, and be sure to leave the factory-applied protective wrap on the sheets until it is time to install. If materials are to be stored outside, cover with a non-translucent material. Use care when handling materials with forklifts, lulls, skid steers, and other material handling equipment.
Installation of Laminated Engineered Bamboo Wall Cladding
While these panels are supplied prefinished and designed for easy installation, it is important to consult the manufacturer before making any adjustments or alterations to the panels before installation. This section will outline best practices and guidelines for installing clip horizontal engineered laminated bamboo outer wall cladding. However, before installing the panels, be sure to follow the manufacturer’s guidelines fully to prevent voiding any warranties. While some of the fundamental concepts may be similar, installation of other engineered laminated bamboo products will have separate instructions that should be consulted and followed.
Prior to installation, proper acclimation is imperative. Before starting any exterior installation, always make sure your material has properly acclimated to local site conditions. If the materials are not properly acclimated for 24–48 hours prior to installation, it could result in poor or undesired results.
Pre-check List Before Installation
Prior to installation, confirm that these important steps have been done properly.
Pre-Check 1: Ensure your structural sheathing has been attached properly to the framed wall system per manufacturer’s instructions and local building codes. Plywood or oriented strand board (OSB) may be used. The panel thickness should be rated for structural application and must be a minimum of 7⁄16 inch thick. Plywood is typically stiffer and stronger than OSB. Thicker plywood or OSB makes a stronger wall and has greater holding strength of the screw. Foam and gypsum boards are not structural panels.
Pre-Check 2: Make sure the drainage plane material has been properly installed. Use the appropriate air and vapor barrier or WRB as specified by the architect or designer. There are many products available to address requirements of the exterior wall in the climate zone where the panels are being installed.
Pre-Check 3: All windows and exterior doors should be installed properly before starting installation of the rainscreen panels. Check to ensure that the installation (and flashing) instructions from the door and window manufacturers were properly followed. Window and door manufacturers’ installation instructions always take precedent over these guidelines.
Installation Process for Horizontal Laminated Engineered Bamboo Rainscreens
Step 1: Ensure all siding boards are pre-finished prior to assembly. This is the only way to ensure that all four sides are coated evenly. It is highly recommended to coat all siding with a UV-inhibiting sealer prior to installation. A UV-inhibiting sealer helps the rainscreens to acclimate more slowly and minimizes surface checking and movement. The manufacturer typically provides prefinished panels, but some installers may choose to add finishes at the site. If done at the site, ensure all surfaces (edges, faces, slots) are properly coated. Follow the stain supplier’s surface prep and coating recommendations.
Step 2: Create a level line for the starter rail on the wall. This can be done with a laser level or snapped chalk line. It is recommend that you complete this on all walls first to ensure the starter rail level line will be consistent on all sides of the building. This step is critical to a successful siding installation and should be done with accuracy. The level line should be positioned approximately 1½ inches above the bottom of the sheathing or 1½ inches above the top of the foundation sill.
Take your time is performing this step well, and all the next rows of siding will be properly aligned.
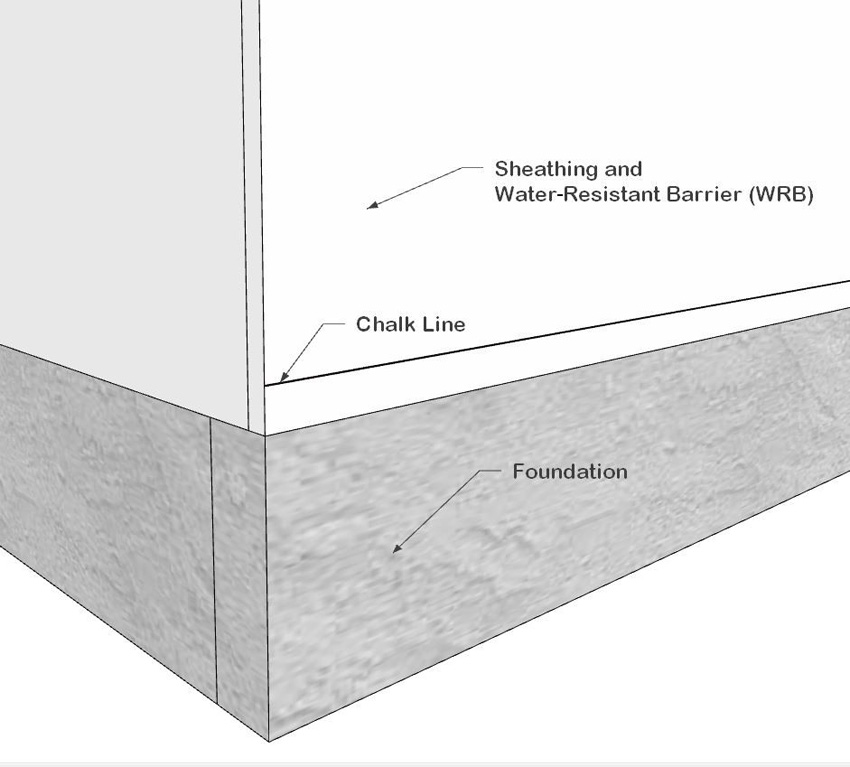
This is an example of chalk line placement at the bottom of a wall. This is where the beginning of the system starts with the installation of the starter rail. It is important to take extra care with this step to ensure proper installation.
Step 3: Install selected engineered corners (optional). If engineered outside corners were specified, install those now. Stainless steel fasteners must be used to fasten the engineered corners to the sheathing. Refer to the manufacturer’s installation guidelines in order for proper fastener spacing.
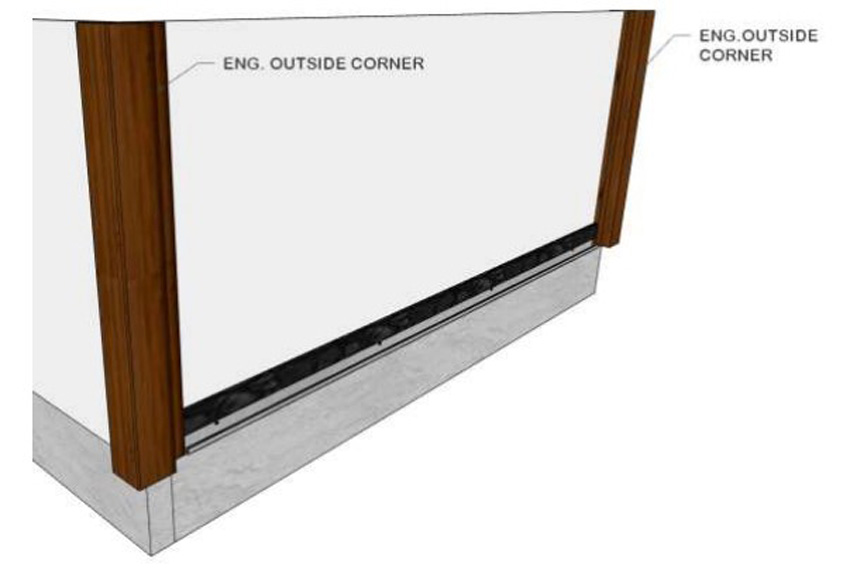
Optional engineered corners can better seal the building envelope while also providing an aesthetically pleasing facade.
Step 4: Install the window and door trim. Install all window and door trim and put proper flashing in place. Always follow the window and door manufacturers’ installation and flashing instructions.
Step 5: Install the starter rail. To speed up your installation and help provide the critical level line to start your horizontal siding installation, use a starter rail. This provides a continuous strip at your bottom course of siding. Many starter rails are provided between 8 feet and 12 feet in length, and they have pre-drilled holes for mounting to the plywood walls and weep holes on the bottom of the rail to allow water drainage.
Step 6: Install the siding vent. It is recommended to install a siding vent system to prevent insects from entering the wall cavity from the ground and allow for proper drainage of water that may penetrate behind the rainscreen system. The siding vent system fills the rainscreen wall cavity between the drainage plane created by the mounting clips. It is also suggested to install the siding vent at the soffit, above door openings, and above/below window openings.
Step 7: Insert the bottom start piece of the laminated engineered bamboo rainscreen siding board into the starter rail. Place the bottom groove of the laminated engineered bamboo material into the starter rail lip. Use a rubber mallet as needed to seat the board properly into the clip. Seating each board properly gives the best alignment for your wall.
If your board does not seat properly, do not install it. Never “force” a board into place. It may cut, bend, or bow the board or other boards around it voiding the warranty.
Attach the rainscreen clips to the top of the siding board. Space the rainscreen clips at 16 inches to 20 inches on center using one screw per clip. For shorter runs, add an extra clip anywhere needed. The more clips you use, the better the board will behave over time.
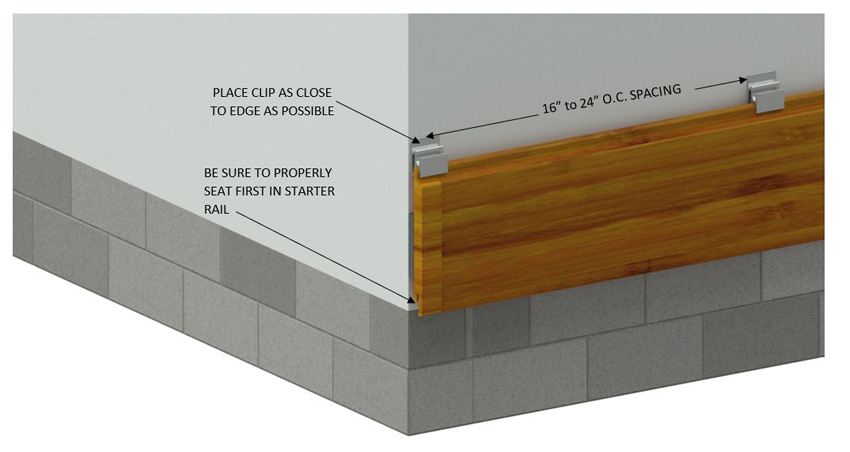
The first laminated engineered bamboo rainscreen has been inserted into the starter rail and installed.
Step 8: Repeat the clip installation process for each row of siding. A major benefit of this system is that the installer can use full length siding boards. Simply use a rainscreen clip at the bottom and top of the joint and straddle the two boards anywhere a joint the length of the siding is needed. Always use two clips to secure the ends of siding boards. When butting two siding boards together, it is a best practice to use the “scarf joint” technique.
A 45-degree angle at each end of cut boards work best. Master craftsmen prefer this method for best results and a quality installation you will be proud of for years. (If you use standard butt joints with 90-degree cuts, over time, the joints may open with weather exposure.)
Step 9: Install the top row of siding. When you reach the soffit (or areas below window openings), it is often necessary to rip the top of the siding to the appropriate width.
The bottom edge of the top row of siding will seat in the rainscreen clip. The top edge of the siding will need to be drilled and face screwed to blocking behind the siding.
